Gardening, The Cutting Garden

Seeding

This process is something I love to do actually. The thought of being in a warm greenhouse, music on and its just me, some seeding mix and the profound, tiny pods of potential. This go around was a wee bit different then what I am used to. I am not working with a greenhouse. My She Shed is a Polly Pocket toy compared to the greenhouse I used to work in. And I’m working with far less seeds then in the past and on an establishment that I’m not used to.

IMG_3386

(RIP Fairview Gardens, all my love)

I am honestly proud with what I have done to make the She Shed an operating mini greenhouse. The fairy gardens have been bumped to the ground shelf to leave room for optimal seed space. I was able to fill 8 shelves in hopes that I will have one more seeding session before the first batch of seedlings are transplanted. I plan to seed in different intervals in order to transplant the growth at different stages to produce continuous blooms. This way I will be able to use some of my planted inventory for scheduled events I have coming up this Summer and Fall. Cost effective and rewarding! When I am working with a bride and she has a low budget but dreams of Oriental Poppies and Lillies, etc., I want to be able to still give her that option. And if I am successful with planting, I will be proud if I can help at least one bride fulfill her vision.

I have sectioned off one small pallet space for veggies and herbs and a separate space for sweet corn. This is just for me and my family. I do have plans create dried herb bouquets and wreaths for some additional Etsy inventory. I planted a variety of colorful blooms, with an addition of some spectacular white and pink Lisianthus and a few delicate organic white Poppies (I have a specific event in mind for these babies). Below I have listed everything alphabetically along with the number of days it takes to germinate:


Amaranthus “Love Lies Bleeding”: 10-14
Bean “Blue Lake”: 7-10
California Poppy “Mission Bells”: 10-12
Carrot “Danvers Half Long”: 7-14
Corn “Sweet Early Golden Bantam: 5-10
Craspedia “Globosa Drumstick”: 20-30
Dahlia “Rainbow Mix”: 8-12
Gypsophila “Covent Garden”: 10-14
Lavender “True”: 15-20
Lettuce “Paris Island”: 7-10
Lisianthus “Sapphire White”: 7-15
Lisianthus “Pink Mix”: 7-15
Mint: 12-16
Oriental Poppy “Mix”: 8-14
Pepper “California Wonder”: 10-12
Sage: 14-21
Shasta Daisy “Alaska”:15-21
Snapdragon “Magic Carpet Mix”: 10-14
Spinach “New Zealand”: 14-20
Sunflower “Border Mix”: 7-14
Sunflower “Mammoth Russian”: 10-14
Sweet William “Double Flowered Mix”: 5-10
Tomato “Rio Grande”: 8-10
Zinnia “Early Bird”: 5-10
Zinnia “Giants of California Mix”: 6-10

Spinach seeds                               Jade leaflet regrowth

I purchased an organic seeding mix to start the majority of my seedlings, but for the sake of experimentation I also acquired a covered kit with soil pods and used Miracle Grow Gardening Soil in another tray. Each of the three trays with the different soil types contains the same few varieties of flowers; Snapdragons, Dahlias, Sweet William, Amaranthus and Oriental Poppies. Hopefully this will help me understand my successes and failures throughout the season.

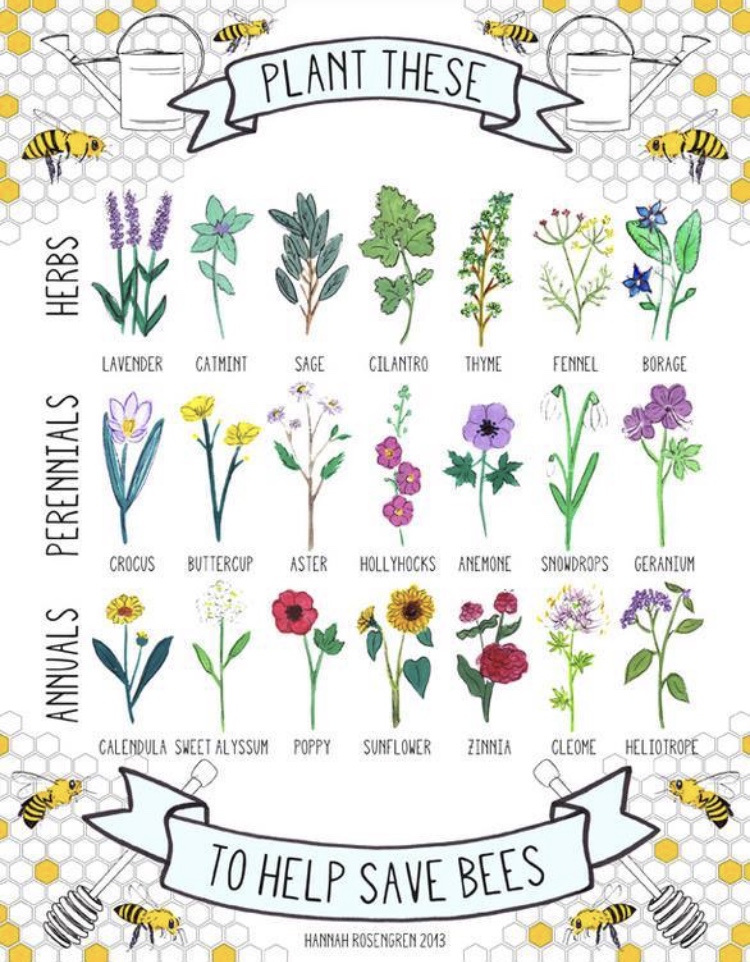
What is super delightful about some of these flowers and herbs is that they will attract bees! And as I’m sure you’ve heard, those little guys need our help. The Beautifully designed image by Hannah Rosengren inspired me to be a little more aware of what flowers I should plant for the cause. It will benefit Mother Earth and your garden with pollinating your flowers and helping your perennials flourish for next year. I hope you guys will consider planting some of these types of flowers too!

IMG_2558

While seeding and absorbing the warmth of the sun, I love to explore the tiny details in each specimen and sometimes its a fun challenge to plant one itty-bitty seed into the single cell of a 100 cell tray. This time I am going to be a little more lenient with my process. If I get a few seeds to a cell, it will be alright. I will just need to thin out the seedlings before transplanting them so they have room to grow. Some day I will grow a bigger operation out of my home, but for now, enough seeds to fill 30 square feet will have to do. It will be plenty to balance between that and growing with my daughter. She will be turning One this Summer and I hope the garden leaves a nice impression on her.


Gardening, The Cutting Garden

The Cutting Garden

This specific process is an experiment for me. But I think that is what most projects really are. I started this one with the intention that it would be easy. HAHAHAH its already not easy, but that is why I have help. My partner, Devon, works in hardscape and landscape so I am lucky enough to reap the benefits of his dirty work. He kindly brings me equipment to use and piles of dirt to shovel. And he’s really great at heavy lifting! Bless him. This time around he has generously filled our backyard with wooden pallets and a large pile of dirt and rocks… and OH am I happy! I am super excited to use these recycled materials to create something new and something BEAUTIFUL! This project is a personal newbie. I have worked on cultivating, seeding and growing Cutting Gardens in the past when I worked for the local florist where I grew up. (Shout out to Steve Malsch at Fairview Gardens, Thank you Sir for introducing me to my dream.) I knew I wanted to grow my business (literally) and I also wanted to spend most of my time growing along side my daughter. Why not combined the two? And why not start now? Balance in life is learned and I have A LOT of learning to do. So I decided to jump right in. Just like I decided to jump into this blog. And just like how I decided as I’m typing this sentence that I would include HACKS that will make the gardening process more organized and how you can potentially and/or eventually include your kids. Now here is an artistically written blurb of the very Sunday morning that began this creative process.

“The flurries still made their way out to us late last Saturday evening. I woke up feeling surprisingly refreshed. I don’t usually get much sleep anymore, since the birth of our daughter, Sage, but there was something about last Sunday morning that was simply motivating. I woke up, opened my eyes and the sun gleamed between the gaps in the curtains, the fresh cut flowers on my dresser were still vibrant from the week prior and the Curly Willow woke up sprouting new buds. What a great way to start any day! Sage and I started our morning as usual, but I was itching to get my hands dirty. The empty pit in our back yard was calling my name and begging to be tilled!”

I could write a book with the number of projects I have planned for this Spring. The garden being the first chapter. I have limited space to work with and my goal for this project is to successfully plant a thriving, vibrant garden of cut flowers in about a 30 square foot area. This way I don’t have to fully rely on wholesale suppliers to create my arrangements. There will be additional garden space to grow herbs and vegetables for personal use that I will keep you guys posted on as well. All in all, time to get serious and talk about #GOALS.

Goals/lessons for todays blog post:

1. This is for beginner gardeners (I have 6 years experience and still consider myself a beginner.) Just know that you don’t have to follow all the rules.
2. This posting aims to show new/seasoned, busy Moms that there is something to teach/learn while gardening with your children (mine is 8 months so for now she will continue to have fun crawling around undoing everything I just did!)
3. Do what makes you feel good. And this could pertain to anything. For me, its watching something grow that I had the pleasure of assisting in that process. (Plants/kids same thing right?)
4. Why is there no “WE” in DIY?! Ladies, Ask for help! Band Up! The only way we can learn from each other is to grow together. No successful person did it all by themselves.


So how did we start!?
Well, we dug a really big hole. And thanks to Devon and my brother, Anders, this part didn’t take too, too long. We needed to dig about 1 ft down and two wooden pallets W/L.
Once the hole was dug, we cut open two large black trash bags and laid them flat in the ground. This way no light can get to the bottom of the hole so no weeds can grow before we are able to plant. We then laid the two pallets down side by side.

The hope was that the pallets will act as a container and the wood slates will separate the types of flowers making the cutting process easier and more organized. And once May comes around with some consistently warn weather we will fill the hole with useable soil and transplant the seedlings. Meanwhile, all of the excess dry dirt that we dug up can now be transported across the lawn to level it out. Devon has a plan to move some large property stones to create another lawn feature. Im excited to see what the result will be. Most of the materials from this project have been recycled and cost us nothing.
It was a little too chilly for Sage to be outside with us. I suggest if you’re trying to include your kids in the gardening process, during this stage if your child is old enough to play with a shovel why not give them their own space to practice. (As long as you can trust them not to eat the soil or any rogue worms.) If they see you putting energy and effort into the digging process they can learn to have fun digging/getting dirty with you and look forward to planting for years to follow. The fun part comes when they can help you transplant the seedlings. But for now just do what works for you and what makes you and your child comfortable in the balance of work and play.

Unfortunately we ended up getting flurried out, but basically completed step one of this experiment. Job accomplished I would say. Next up is the more tedious part of the experiment. Seeding. We will dig more into that come April. In the meantime, finding/setting up a warm place for the seeds to germinate is my immediate goal. I’ll be back with information on what I end up doing. I look forward to finding out myself! Thanks for reading!